What Setting Do I Use On My Spreader?
- "The Lawn Care Nut"April 4, 2024
I’ve been working with homeowners online for the last 20 years. I answer dozens and dozens of questions every week via YouTube comments, Facebook, Instagram, X, email, support tickets, and everywhere in between. Everyone is “throwing down,” and that brings up questions.
Right now, a large portion of the questions center around the concept of “how much fertilizer do I put on the lawn?” and that inevitably leads to the question of “what spreader setting do I use?”
Since I needed to make my springtime application of Milorganite at my house, I figured I’d dive into the settings and the math behind them and provide some detailed training on “how to apply Milorganite with a Scotts spreader.”
A couple years ago I made a pretty detailed video talking about some of the most common lawn spreaders that I see throughout the DIY community. By far, the Scotts EdgeGuard DLX is the most common.
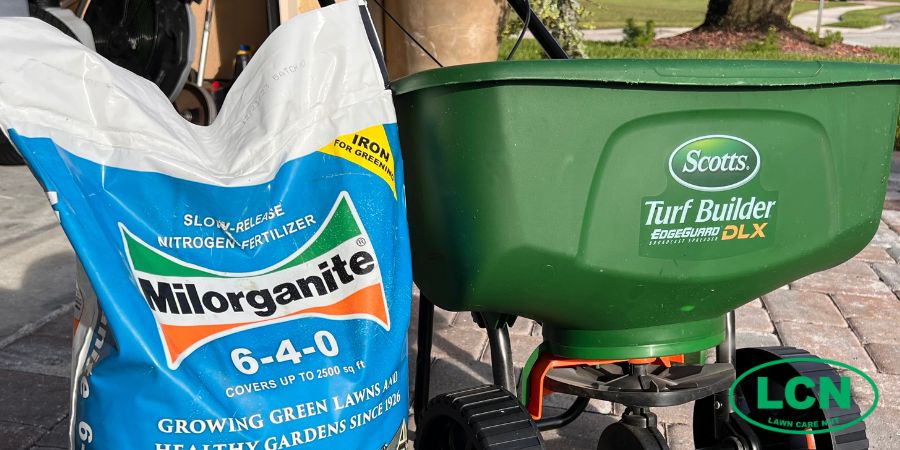
It’s not really the highest-quality spreader, but it works. You can get the job done with it and the reason it’s so common is because it’s sold in every Lowes, Home Depot, Menards, and Ace in the country. There really aren’t a lot of other choices at the big box.
In most cases, applying fertilizer is as simple as 1) buy the spreader, 2) look on the bag of Milorganite for the setting, 3) fill the spreader, and 4) go!
But what if something doesn’t turn out right and you come up short? How can you know what happened and why?
Here’s the thing: That Scotts spreader may have been sitting at the store for a year or more, banged around, bumped, and bent. You just never know. If you have an older one, it may have been stretched or damaged along the way, too. It’s mostly plastic and some thin metal—how do you know if you can trust it?
So today, I am going to take you through making an application of Milorganite with a brand new Scotts Edgeguard DLX spreader. Let’s confirm that it’s properly calibrated.
Calibrating your equipment is important, and it’s also a way to learn more about the applications you make, why and how. Let’s get started.
Pounds on the Ground
Before we test the setting, we need to get some basic information from the bag. On the bag, look for the coverage and the weight. You will find that in lawn care, we talk about lawns in terms of size and that size is always expressed in terms of square footage.
With this information we can now figure out what our “application rate” is. In lawn care, we break everything down into 1,000 sq ft increments. No matter what you are applying to your lawn: fertilizer, insecticide, fungicide, bio-stimulants, whatever it is, you will always find that the application rate (how much to put down) is expressed in increments of 1,000 sq ft on the label.
Write that down: in lawn care, our application standard is measured in increments of 1,000 sq ft.
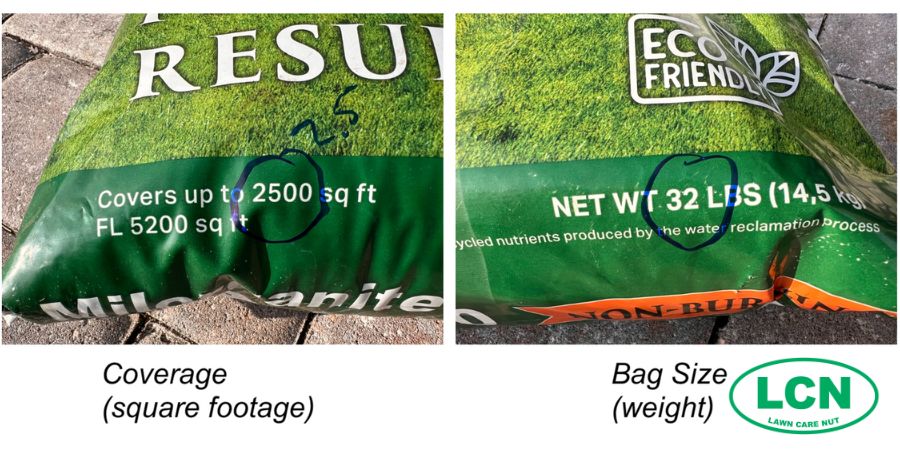
Here, you can see the bag of Milorganite covers 2,500 sq ft. Since 1,000 sq ft increments are the standard, I can now determine how much Milorganite should go down on each 1,000 sq ft of lawn area that I have. Let’s do a little math:
32 lbs. / 2.5 = 12.8 lbs.
That is telling me that the application rate for Milorganite is 12.8 lbs. per 1,000 sq ft. When I go out to apply Milo to the lawn, it’s my job to ensure I am evenly putting out 12.8 lbs. across each 1,000 sq ft area.
Measure Your Lawn to Calibrate Your Spreader
Now before we go too much further, I recommend you go outside and measure your lawn. Break it down into logical segments of 1,000 sq ft. In this video "Measuring The New Lawn - Property Mapping" I show you how to measure by walking off the lawn. You can also use satellite technology to measure your lawn. Here is a screenshot of my lawn all broken down. It’s ok to round to the nearest 500 sq ft.
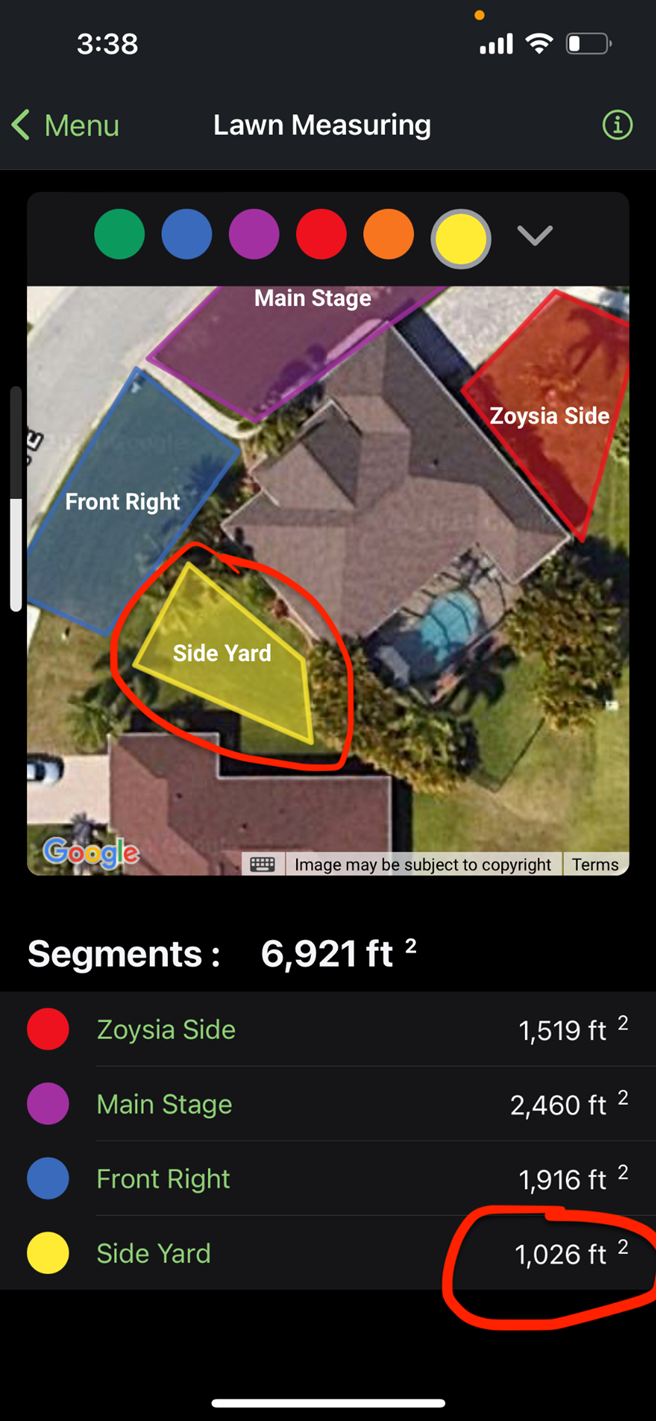
See there in blue I have a section of my lawn labeled “front right” that is 2,000 sq ft (1,916). So if I wanted to apply Milorganite to that section of my lawn, I would need to put out 25.6 lbs. (12.8 x 2 = 25.6) of Milo and I’d use my Scotts spreader to distribute evenly across that section.
I have another area listed as “main stage” and you can see it’s right at about 2,500 sq ft. That’s one full bag of Milo for that area. (12.8 x 2.5 = 32) Easy right?
Not necessarily.
I’ve seen this happen many times: homeowner buys the Scotts spreader, dumps the entire bag into the hopper and sets it to the setting and then takes off. Only to find that they get about halfway done with the section and the hopper is completely empty! Where did it all go?
Or on the other end of the spectrum, you dump the bag in, set it and go out and when you finish the lawn you have a lot leftover. Why didn’t it all get put out?
If that was to happen to you, wouldn’t you want to know why? You’d certainly want to make adjustments so the next time you get down the right amount right?
How To Apply Milorganite - Beyond Spreader Settings
When I flip the bag over and look at the spreader settings, I can see that the setting for the Scotts EdgeGuard DLX is 11.5. Setting the spreader to that number allows the fertilizer to drop from the hopper and down onto the impeller below. The larger the opening, the more Milo can drop. The setting of 11.5 is what is recommended for Milorganite to allow 12.8 lbs. to drop through and be spread using a Scotts EdgeGuard DLX spreader, but you still need to know 2 other pieces of information.
When broadcasting the fertilizer, you need to know the setting so enough comes out, but you also have to calibrate your walking speed and your overlap from pass to pass. These two pieces of information are even more important than the setting itself. If you walk too slowly, the fertilizer will drop out before you finish your area. If you walk too fast, you won’t get enough down and may not get the results you are expecting.
Same goes for the overlap. When applying fertilizer with a broadcast spreader, as you go back and forth from one pass to the next, you throw fertilizer back to the wheel tracks of the previous pass. This ensures an even and consistent application.
Testing For Accuracy
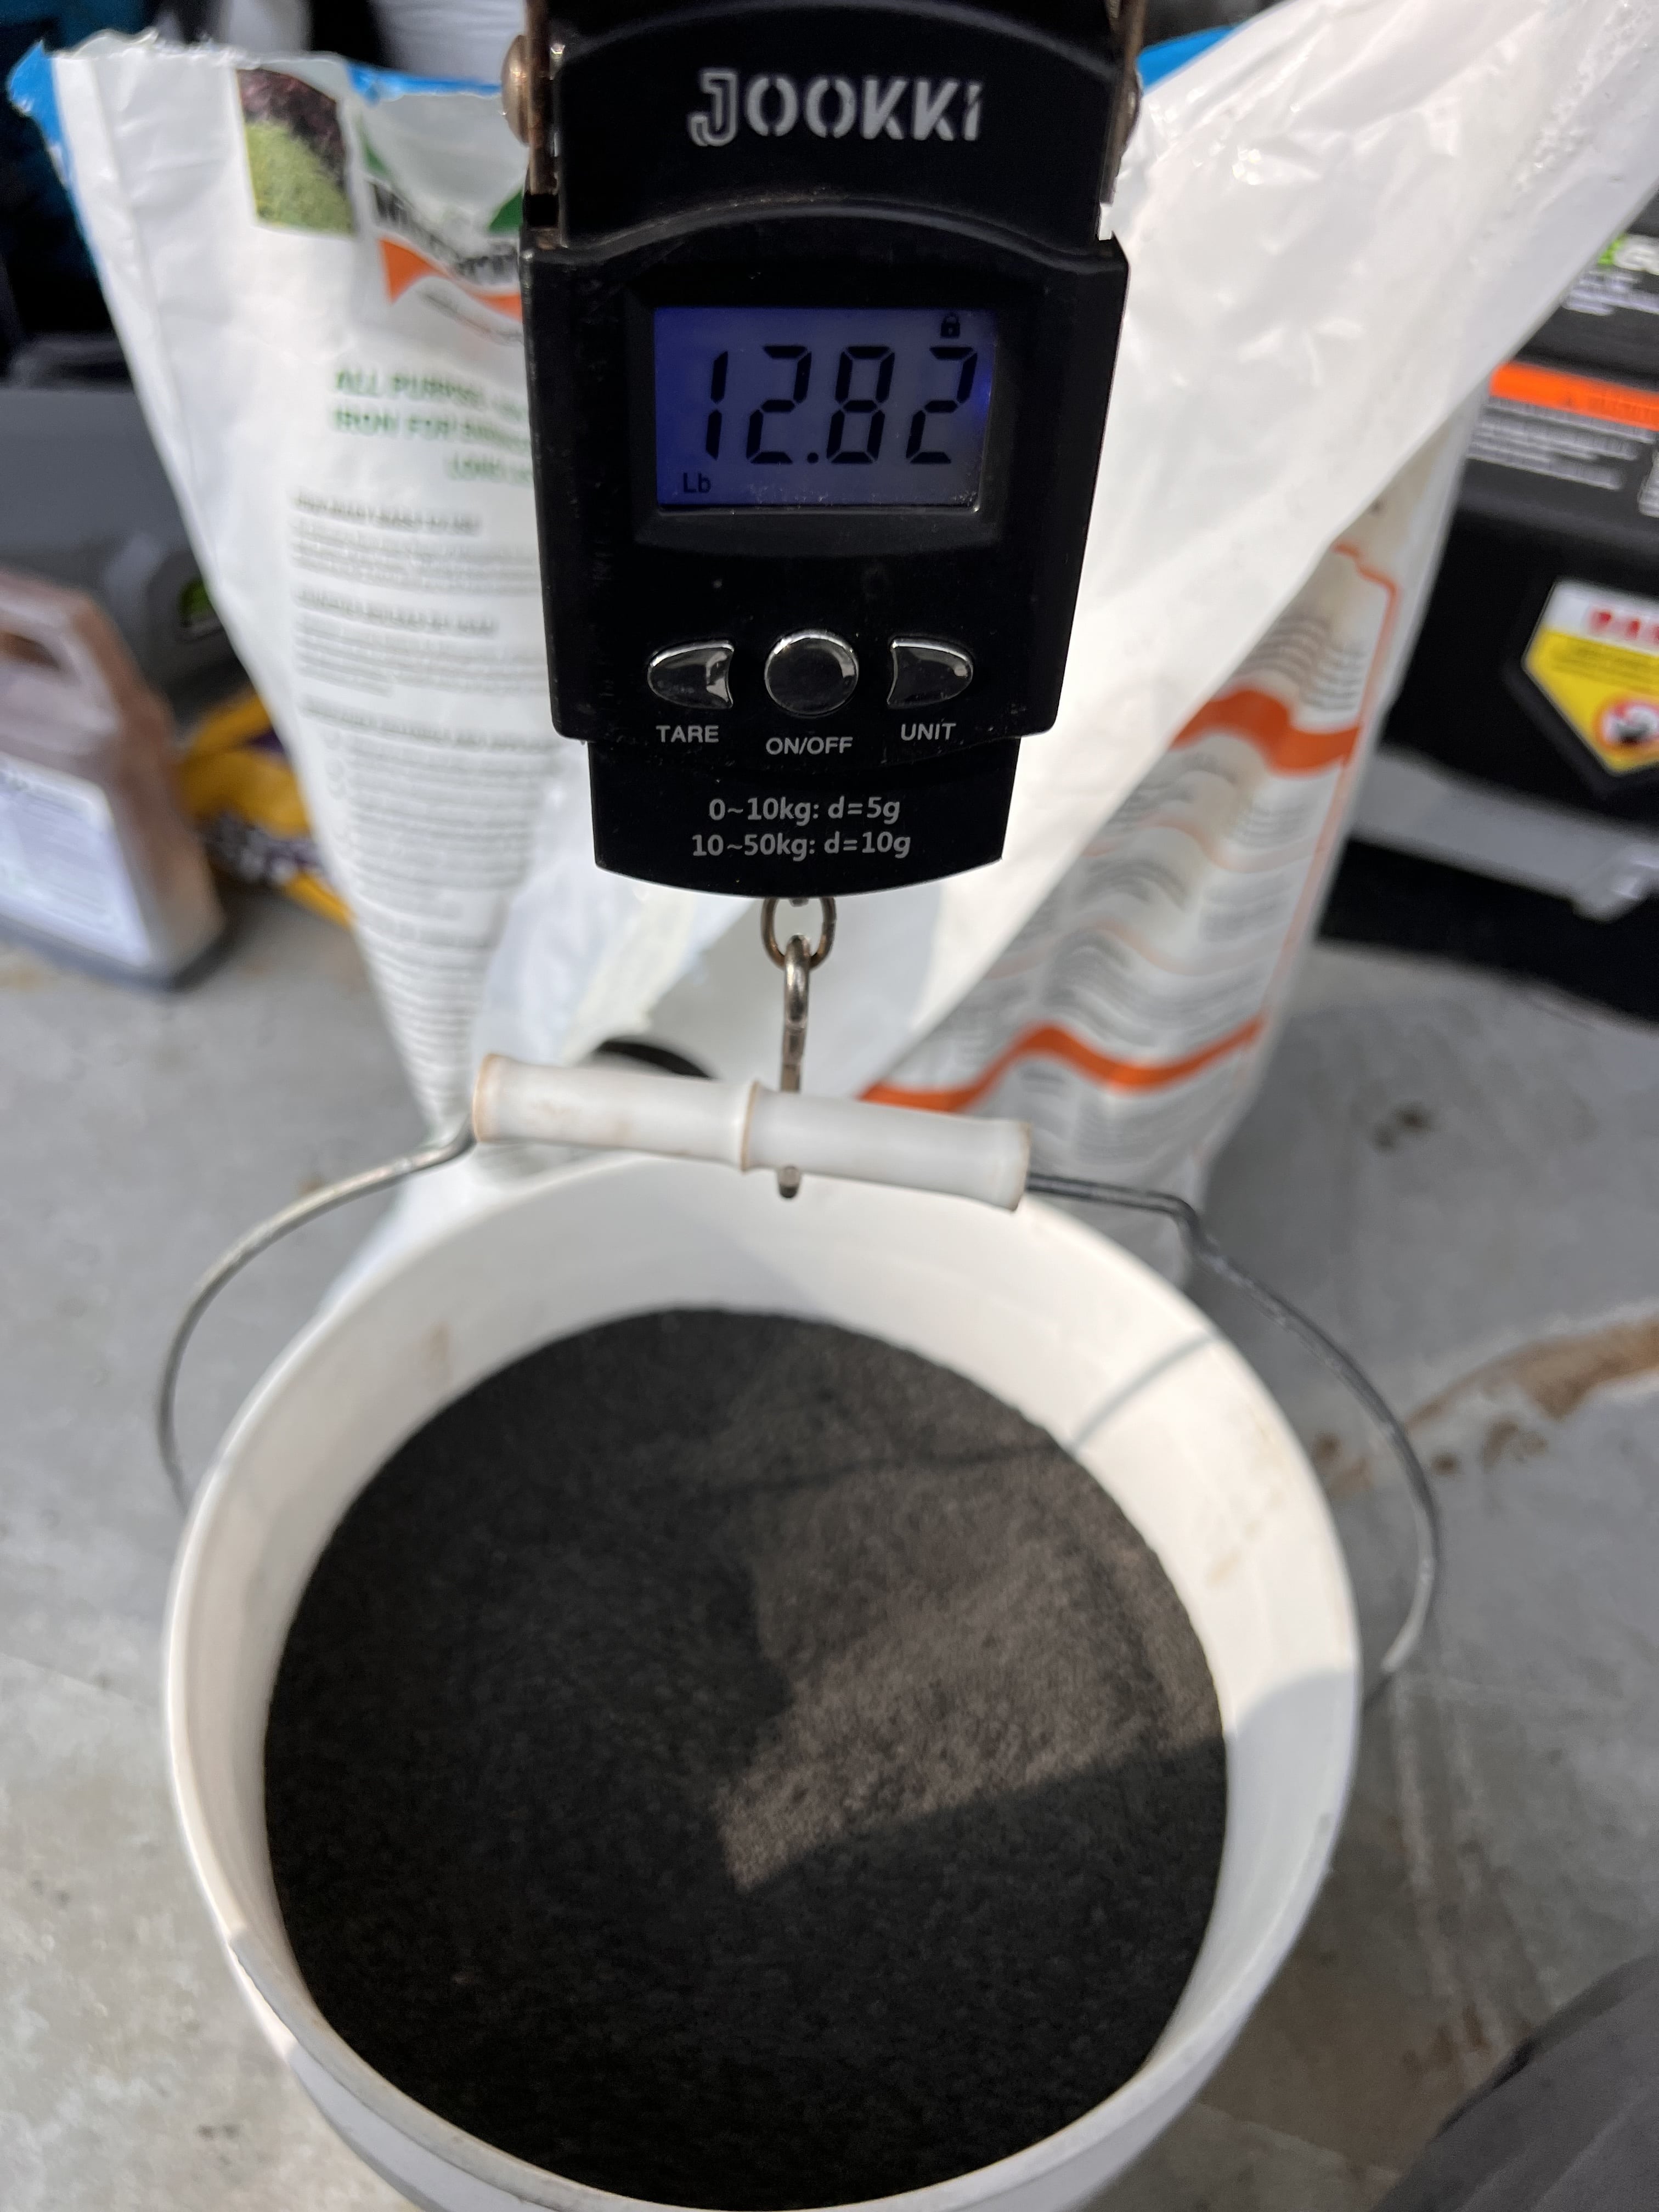
It takes just a little bit of practice to master the walking speed and overlap. If you are just starting out, I recommend you find a section in your lawn that is just 1,000 sq ft. That’s where you are going to start practicing and calibrating your spreader.
See on my map where I have “side yard” listed? That section is right at about 1,000 sq ft. If I wanted to apply Milorganite there, I’d put 12.8 lbs. into the hopper and go out and spread it!
And it’s that area that I want to use to test and calibrate my spreader. I want to make sure that the setting, walk speed and overlap are all accurate and by choosing this 1,000 sq ft section, I am not risking wasting an entire bag if something is wrong. Milorgantie won’t burn your lawn if you make a mistake and over apply, but it doesn’t really matter now because I am only testing on a small area so I can’t mess things up too badly!
The best way to weigh your Milorganite for this exercise is to get a cheap luggage scale from Amazon like you see here in the picture. You will use this scale for other granular products that you apply during the year as well because remember, everything in lawn care (fertilizer, insect control, fungicide) is all expressed in application rates of pounds per 1,000 sq ft.
I created a video, "This Is The Right Way To Apply Milorganite", that you can view where I go into more detail on these elements: the setting, the overlap and the walking speed and show you how it’s done.
I tend to over-complicate this stuff when I get going, I know. I do that because I want you to understand the “why” behind my recommendations. In reality, once you go through all this calibration and make 2 or 3 applications to your lawn, this will all be just like riding a bike to you. The walk speed and overlap will become second nature. Fertilizing your lawn is NOT that difficult. You can be just as good as any professional out there after you get the hang of it and it only takes a little practice to get there.
Now, in the video, "This Is The Right Way To Apply Milorganite", you can see I came out almost perfect. That’s because I’ve been doing this for a while and the walk speed is second nature. Chances are you will hit it just right your first time too. But if you don’t, let’s look at what you can do:
Scenario 1 - you finish your 1,000 sq ft test area and you have some product leftover. (more than ½ lb.) Here are your choices for adjustment
- Slow down your walking pace a little
- Open up the spreader setting a little more
- A combination of these 2
It will depend upon how much Milo you had leftover. If it was ½ lb. or less, then just call it good, no need to adjust anything. However, if it was 1lb or more, make the suggested adjustments and then choose another 1,000 sq ft section, weigh out 12.8 lbs. of Milo, and go test again. It should only take you having to do this 2 or 3 times before you have it literally “dialed in.” From there, remember what adjustments you made and going forward, keep it consistent.
Scenario 2 - If on the other hand you came up short on your application. You went out to your test section and ended up running out of fertilizer before finishing the 1,000 sq ft area, then you have this choice.
- Speed up your walking pace a little
- Back down the spreader setting a little (close it)
- A combination of the two
Same thing here - make the adjustments and choose another section to test. You will find that your intuition will guide you here. As you push the spreader and see the fertilizer coming out and the hopper draining as you go, things will “click” in your head and you’ll be able to easily adjust the walking speed accordingly. This is the part that I can’t really tell you on paper - you just have to go out and push the spreader and you’ll just “get it” when you do.
Whatever adjustments you had to make, just keep those in mind as you continue to apply Milo to the other sections of your lawn. I know I said this before but I will say it again: this isn't difficult to figure out. You only have one lawn to manage and after walking it 2-3 times you’ll learn it very quickly and be making proper applications every time from there.
I recommend you calibrate your spreader at the beginning of every season just to make sure everything is performing properly after winter.
Have fun and Throw’er Down!