How to Compost in Your Landscape
- horticulturist and gardening expertJanuary 16, 2021
Don’t let the size of your garden or landscape design stop you from composting plant trimmings into valuable compost. Even those gardening on rooftops and on small city lots have found ways to make this happen. And formal gardeners have some pretty impressive tricks for hiding their compost setup while keeping it convenient.
For more than 25 years I gardened in a small city lot. I filled every square foot with flowers and edibles so finding space to compost was challenging. I made a bin of recycled heat-treated pallets lined with hardware cloth. then covered the sides and front with lattice so it looked like an extension of my fence. No one had to see my yard waste decomposing into compost so everyone in the neighborhood was happy.
Even apartment dwellers can find creative ways to include composting into their gardening efforts. My friend a rooftop gardener in Manhattan, NY, composted in containers. These micro compost bins allowed her to convert small amounts of vegetable scraps and plant debris into compost. This allowed her to put it to work in her garden rather than hauling it down the elevator and taking it to the recycling center via taxi.
You’ll find lots of ideas, projects, and DIY solutions for creating composting stations in both small and large lots. Don’t let the array of options overwhelm and stop you from creating your own compost set up. You’ll quickly recoup your initial investment in time and money by spending less time hauling materials to the recycling center and money spent on soil amendments. Most importantly you’ll boost the health and beauty of your landscape while helping the environment.
Let’s start by helping you find the best location for your composting setup. Start with a call to your local municipality. Some have regulations on the type of compost bins they allow while others offer rebates or discounts on approved models. Then we’ll go over the specifics on how to compost, turning garden trimmings into a valuable soil amendment.
Creating Your Compost Location in Your Landscape
Place your compost pile in the landscape or right in a garden bed where the materials to be composted can easily be moved into the bin, pile turned, and finished compost harvested and transported back to the garden. You found a place to stow the trashcans without ruining the beauty of your landscape or offending your neighbors, so do the same with your compost area.
Composting works in sun or shade Piles in sunny spots will decompose quicker but also dry out faster and may need supplemental watering during hot dry weather. Those located in a shadier spot will stay moist longer but decompose slower. In either case, make sure the soil below the pile is well-drained. This prevents the pile from becoming waterlogged; slowing decomposition and leading to a smelly pile.
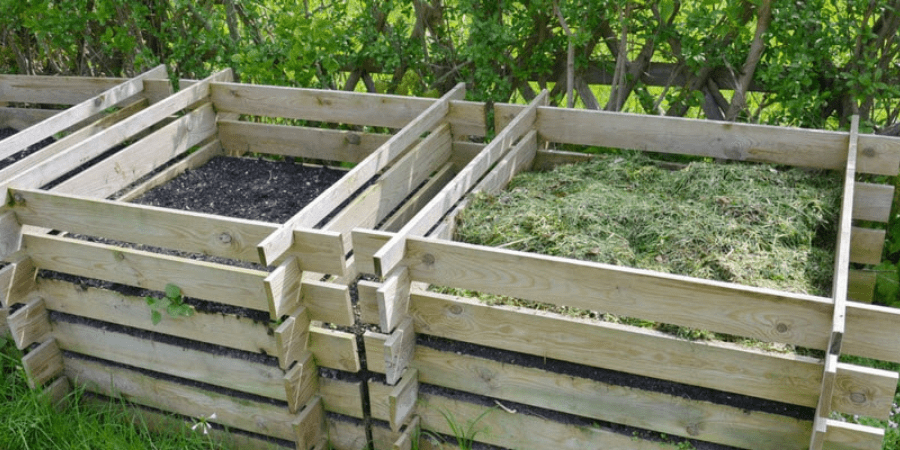
Purchase or build a compost bin that matches your landscape style. Some bins are built to be an attractive addition to the landscape while others are meant to fade into the garden unnoticed. Check your local hardware store, garden center, and on-line garden catalogues for inspiration and ready to purchase compost bins. Or, build your own from pallets, snow fencing, wire mesh, and 2 x4 lumber. You’ll find lots of plans on the internet, including recommendations from University Extension Service websites.
Save your back and space with a tumbler compost bin. Hard plastic and metal drums are mounted onto legs, elevating your compost bin to a comfortable height for unloading. Just add the landscape trimmings, a bit of finished compost, moisten and turn your pile to mix things up with a simple spin of the drum. Two tumbler composters or a dual bin tumbler allow you to stockpile raw materials in one bin while actively composting in the other. Eliminating on-going additions to the active bin speeds up decomposition so you will be harvesting finished compost much sooner. Plus many urban municipalities prefer or require these types of compost bins.
Use plants to screen the composting process. Place a simple wire bin in the middle of the garden. It’s convenient; since this is where you generate the garden debris and use much of the finished product. The surrounding plantings will hide the process.
Hide your compost bin by placing it at the back of the landscape behind a screen of tall grasses, shrubs, or other permanent plantings. Check all sides and make sure your neighbors’ views are equally as nice. And leave sufficient room for adding raw materials to the bin, turning the pile as needed, and harvesting the finished compost.
Consider teaming up with your neighbors to create more gardening and composting space. Design a shared garden and compost area across the lot line. Use steppers for easy access and beautify both yards with attractive plantings. You’ll each enjoy the extra garden space and the valuable compost you create.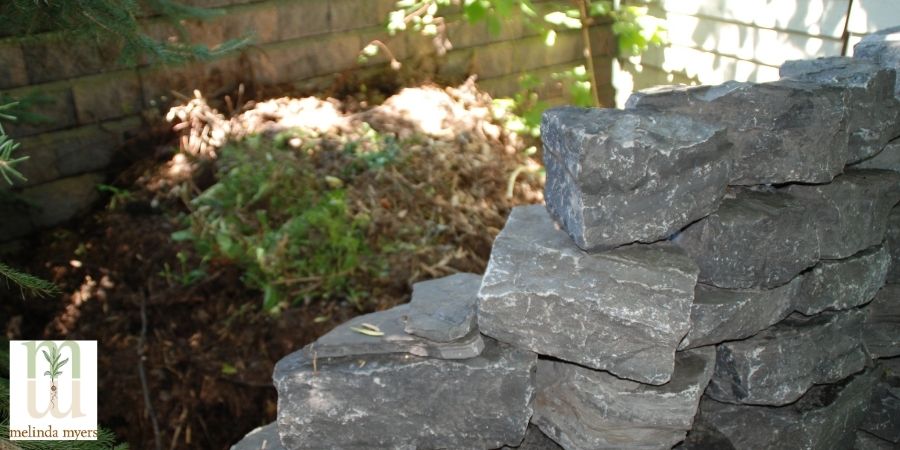
Up the beauty of your composting area even more and add outdoor storage space. Install a decorative fence or wall as a backdrop for one of your garden beds. Design the screen to run parallel to a fence or hedge along the lot line. Leave enough room between the two structures for composting as well as storing mulch, shredded leaves, garden stakes, tomato towers, and more. Include a gate or entryway along the side for easy access.
How to Compost
Now that you selected the location and created your composting station it is time to start turning landscape and garden trimmings into compost.
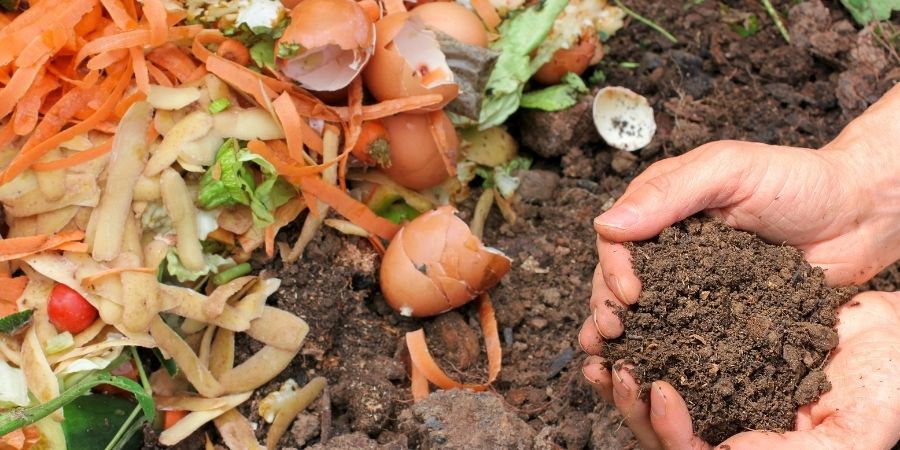
Composting is as simple as putting green debris into a heap and letting it decompose. The more effort you put in the faster you’ll have finished compost to add to your garden. Do not add perennial weeds, invasive plants, weeds gone to seed, diseased- and insect-infested materials that aren’t killed in most compost piles. Keep meat, fat, bones, and dairy products that can attract rodents out of the pile.
Building an efficient compost pile. Creating a compost pile of green, nitrogen-rich, and brown, carbon-rich, materials creates a mixture that breaks down more rapidly than a random mix if trimmings. Start with an 8 to 10” mixed layer of browns like fall leaves, dried plant debris, cornstalks and straw and greens like plant-based food scraps, herbicide-free grass clippings, and fresh vegetable trimmings.
Cover this with finished compost or soil and sprinkle the surface with 3 cups of Milorganite. The nitrogen and 85% organic matter in Milorganite helps feed the microorganisms that break down the raw materials into compost. Repeat until the pile is at least 3 feet high and wide. Cover the top and edges with browns and moisten the pile to the consistency of a damp sponge.
Give it a Turn for quicker results. Allow the pile to heat up for several days. Turn the pile as the temperature in the center of the pile begins to drop or your schedule allows. Move the more decomposed materials in the center of the pile to the outside and those on the outer edge to the center. Repeat as time allows. Add moisture if the pile becomes too dry and mix in dry materials if it becomes waterlogged and begins to smell.
Harvesting and Using compost. Your compost is ready when the material is crumbly and dark. Add compost to newly created gardens as well as annual flower and vegetable gardens to improve drainage in heavy soils and increase the water-holding ability in sandy soils. Spread a one to two-inch layer of compost over the soil surface of perennial gardens every other year or two. And add it to the planting mixes used for your containers.
Keep your compost pile working year-round. Add a cover of clear plastic to warm the pile and trap heat keeping your compost pile working throughout most if not all winter. The plastic covering also prevents the compost pile from becoming waterlogged during long stretches of wet weather.
Once you start exploring and discover the many options, you are sure to find a way to include composting into your landscape and gardening efforts. Then enjoy the increased beauty and productivity the finished compost provides in your gardens and containers.