How to Plant Plants in a Container
- horticulturist and gardening expertMay 14, 2022
A trip to the garden center in search of plants to fill your empty containers can be overwhelming. So many beautiful plants it is hard to know which ones will thrive and look best in your container gardens. Fortunately, it is easier than you think and most plant tags contain the information you need for selecting the right plants for your container gardens.
Reduce the stress and elevate the fun by doing a bit of research before you go shopping. The internet is filled with lots of examples and many plant growers provide container design recipes to make this task easier for you. Be prepared to make substitutions as all the plants shown in these container garden recipes may not be available when you go shopping. These do, however, provide a starting point allowing you to find suitable substitutes to accomplish similar results.
Designing Your Container Garden
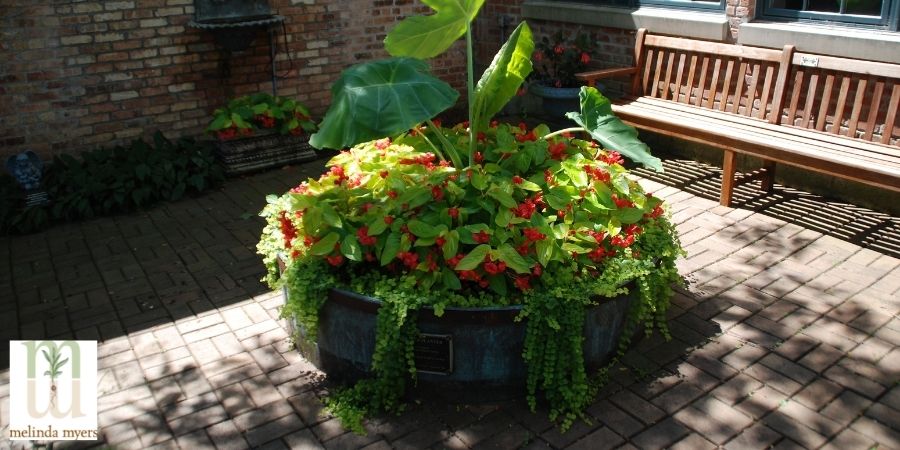
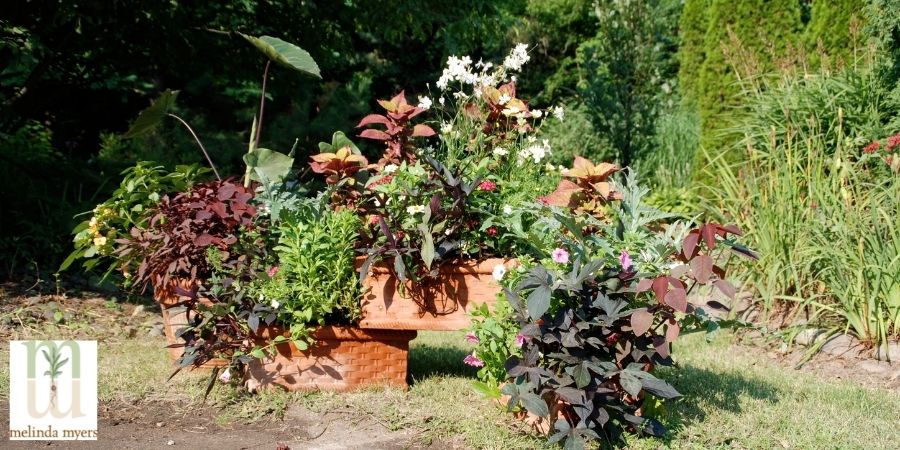
The thriller, filler, and spiller technique is one option that provides a starting point for designing your own container gardens. Taller plants or vines trained on upright supports provide the focal point. Trailing plants cascade over the side of the pot and anchor the planting to the container. Smaller upright or mounded plants connect the thriller to the spiller and fill the empty spaces between the two.
You can also fill hanging baskets and planters with one type of plant, Use the same color, a blend of similar shades or contrasting colors. A container of calibrachoas, impatiens, coleus, or fuchsias can provide eye-catching color on the patio, deck, or at the front entrance.
Keep the planting in scale with the pot and the surrounding buildings or plantings. Plants that are too big for the pot look out of place and may topple in the wind. Tiny plants in a large pot or near a tall fence may not provide the needed impact in the space.
Planning for your thriller to be about two-thirds the total height of your container is a good place to start. You will usually need to wait for plants to reach their mature height. Be patient as plants grow or include a bit of upright garden art to provide immediate height in the planting.
Think about where the container garden will be displayed. If placed against a wall, mounted on a fence or in front of other plants concentrate the design on the sides that can be viewed. In this case, the thriller could go to the back of the pot with fillers and trailers filling the sides that can be seen. For those pots with all sides visible consider placing the thriller in the middle of the container and surrounding it on all sides with fillers and trailers.
As you design your planting decide if the container is the star or the plants. In some cases you want both to be noticed equally.
Highlight beautiful pots with subtle plants and place them in locations where they can be seen. Our local botanical garden had a beautiful antique terra cotta pot. One year it was filled with a sago palm and impatiens and set in a bed of the same impatiens. I commented on the container to one of the gardeners. She pointed out that I had walked past this pot for years when it was located next to the entrance of the garden house. Obviously, I noticed the flowers, not the container when it was placed there.
My friend Jerry, an excellent container garden designer, has planted container gardens in plain black grower pots. You can usually find these in the recycling area of your garden center. He fills the pots with new and unusual plants that he wants to be the focal point. As the plants fill in the pot serves as nothing more than a backdrop for the beautiful flowers.
Jerry's Containers
Perhaps you want your plants and containers to command equal attention in your design. Select plants that complement the color and style of the container to accomplish this.
Add some fun and personality to your plantings by repurposing items into planters. I have used and seen a variety of items converted into planters. Old boots, kids’ toys, tea kettles, and colanders are just a few ideas. Your creativity and items available in your garage, shed or local thrift shop are your only limitations.
Make sure the item you select can hold sufficient soil. Keep in mind the smaller the container the faster the limited amount of soil will dry out. That means you will be watering more often.
Drill holes in the bottom of the repurposed item, if needed, to allow excess water to drain out of the container. If this isn’t possible consider planting in a nursery or other pot that does have drainage holes. Place pebbles in the bottom of the decorative pot. Set the planted pots with drainage holes on top of the pebbles inside the fun container. The pebbles elevate the planted pot above any water that collects in the pot that lacks drainage holes. Pour off excess water as needed to avoid root rot.
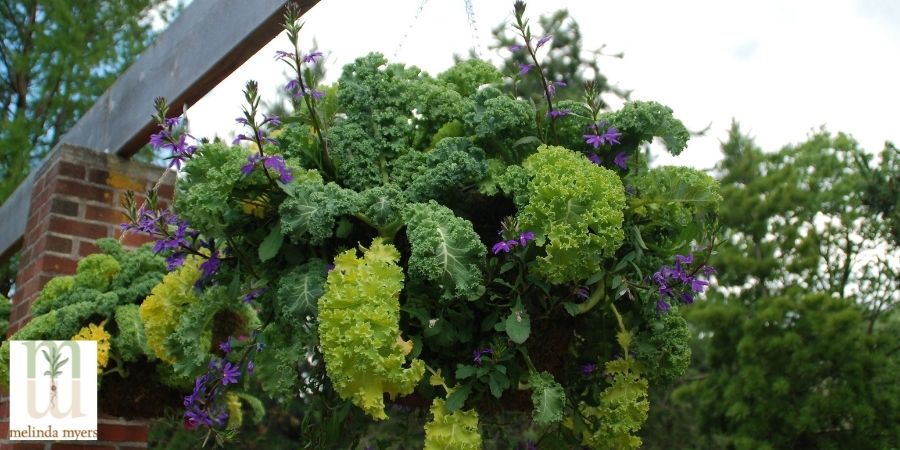
Consider mixing flowers, herbs, and vegetables in pots for pretty and edible container gardens and hanging baskets. Include some butterfly, hummingbird, and pollinator favorites to help support them and enjoy the motion and color these winged visitors provide.
Give your container garden a twist by strategically stacking containers and then planting them to create a dramatic display. Fill containers with potting mix, make sure the pots are secure, and fill the exposed areas with plants. This is another way to add vertical interest even when growing shorter plants like succulents in all the different levels.
Setting containers in garden beds can add vertical interest and create the illusion of depth even in narrow borders. It is also a great way to fill space left by fading annuals or plants that did not survive the winter.

Once you have your containers and locations selected it is time to purchase some plants. I like to fine-tune my design ideas when shopping at the garden center. I grab a cart and select new or favorite plants I want to use as vertical accents or focal points in containers. Then I wander through the section that features trailers. I look for those that complement the plants I already selected. Finally, I look for any plants that would combine well with the other two. I find an out-of-the-way place to test my designs on the garden cart.
Once home I put the combinations together in the pots and place in the desired location. I have to admit I have ended up with a few stray plants, so back to the garden center I go. It’s a good excuse to buy more plants.
Planting Your Container and Hanging Baskets
Fill your container with a quality planting mix. Find the brand that works best for your gardening style. Fill the container leaving about a half an inch in small planters and an inch or more between the top of the pot and potting mix in larger containers. This allows you to water thoroughly without washing soil out of the pot.
Add slow-release Milorganite fertilizer at planting to provide weeks of nutrients to the plants. You’ll save time and avoid the hassle of mixing fertilizer and applying it every week or two. Make a second application 6 to 8 weeks later. Just mix the Milorganite into the top inch of potting mix. The low nitrogen slow-release fertilizer won’t damage new plantings or container gardens even during hot summer weather.
| Container Size | Tablespoons of Milorganite |
|---|---|
| 5-Gallon | 10 (2/3 cup) |
| 2-Gallon | 4 |
| 1-Gallon | 2 |
| ½-Gallon | 1 |
| 6-Inch | ½ |
Now you are ready to start planting. You can set the plants close together in the container for an instant display. As the plants grow they tend to become overcrowded. The more vigorous plants will overtake the more timid, the display may deteriorate over time and you may see an increase in disease problems. You can do a bit of pruning and remove struggling plants to extend the life of the garden. Or start a new container garden to take its place.
The other option is to give plants space to grow and reach their mature size. You will need to wait for them to fill in and reach their full beauty but the display will remain attractive throughout much if not all of the season.
In general place three or four plants in a 10-12” pot, four to six in a 14-16” container, and six to eight in a 16 to 20” planter. Adjust this number based on the size of the transplant purchased and the mature size and growth habit of the variety of plants selected.
Starting with larger transplants provides quicker results. You will need fewer plants or larger pots to accommodate the plants and their larger root systems.
Check the plant tags for the mature height and spread of the plants you select. This will help you determine how many plants to include in the container you are using.
When sweet potato vines were becoming popular years ago, a friend gave me a few to try. I planted 3 of these vines and several annual flowers in a 20” pot. If you have grown this vigorous vine you know I used 2 too many. We all make mistakes; it is how we improve our gardening and design skills.
Many of the newer petunias are also vigorous growers. You’ll only need a couple of plants to fill a large pot and provide a big splash of color.
Caring for your Containers & Hanging Baskets
Once planted your container gardens and hanging baskets need regular watering. Always water thoroughly until the excess runs out the drainage holes and away from the pot. This encourages deep more drought-tolerant roots.
Check soil moisture daily. I like to use my finger as a moisture meter. Stick it several inches into the pot. When the potting mix is starting to dry it is time to water.
You can use other clues to help you decide if the container needs watering. Lift hanging baskets and note the difference in weight between a freshly watered pot and one that needs watering. Leaf color can also be a clue. Leaves turn a blue- or gray-green before wilting indicating its time to water. With experience, this does get easier.
Watering wands connected to the hose allow you to gently water directly to the soil surface where it is needed. Look for those designed for watering hanging baskets, The additional curve at the watering end prevents water from running down the watering wand and your arm.
Use pulley systems to make watering and maintaining hanging baskets easier and more convenient. Simply lower the planter as needed for ongoing care. If it is easy, you are more likely to provide the regular care needed to keep your hanging basket looking its best.
Extend the time between watering with self-watering pots. These containers have reservoirs to store water, releasing it as the plants need it. You’ll be watering less often when using these containers.
Use devices like plant nannies to extend the time between watering. These devices are placed in the soil and a decorative bottle or 2-liter container of water is set inside to release water as needed. You may need several of these for larger containers.
Consider incorporating an organic and sustainable product like Wild Valley Wool pellets into the potting mix to absorb excess water and release as the soil dries. This product reduces watering by up to 25% and adds air space to improve plant growth.
Use drip irrigation to reduce time spent watering containers and hanging baskets. Individual tubes are placed in each pot and connected to a pipe or hose. Just turn on the faucet and water all the pots at once. A timer makes it even easier. Regularly check to make sure critters have not dislodged the tubes and all pots are receiving the needed water.
Set containers on pot feet and pot risers to elevate pots above water that collects in the saucer or under pots set directly on a patio, deck, or walk. This also reduces the risk of stains to the surface below the pot.
Remember to make an additional Milorganite fertilizer application 6 to 8 weeks after planting. For those gardening in milder climates you may even need a third application to keep your containers thriving throughout the fall.
Take pictures of your plant combinations to remember those you want to repeat and those that are a one-time only design. Make notes on strategies that helped increase success and reduce maintenance. Most importantly, have fun as you plant, plant and enjoy the beauty of your container gardens and hanging baskets.